To get familiar with the anatomy of the backpack is important, which helps you choose a backpack based on your needs. Maybe you’ve learnt what all the different parts of a backpack are or what we call them. Many are pretty self-explanatory, but if you come across an occasional term that you’ve never heard of, don’t worry. We might have just made it up.
In this article, I’m putting down the key parts of a backpack that most good backpacks have. I’ve also indicated what each of their uses is. So look out for these parts if you’re buying a backpack.We present what we believe is a fairly comprehensive list.

Backpack Front View

Backpack Back View

Backpack Side View
The below post outlines:
- The compartments (including opening style, access point, and other types of pockets)
- Types of straps
- Additional features and add-ons
- The hardware (zippers, buckles, etc)
Clamshell
backpacks open like… clamshells.

Three sides can be upzipped, leaving one side to act like a hinge. Another name for this is suit-case style opening since the panel can lay flat. You’ll most often see this on travel bags or backpacks of larger capacity.
Splayed
openings are very similar to clamshell/suitcase openings except that they may not necessarily open all the way.

You’ll see this often in techy backpacks — the splayed opening allows you to open a hard-shelled backpack. Some backpacks have a splayed opening that can be converted to clamshell.
Roll-tops
are tops that… roll down. Once rolled, these openings are usually held down by buckles or hooks on both sides. The benefit of these are that they allow you to expand the volume of the backpack upwards and are also more effective at keeping water out than zippers. Hence camping dry sacks are roll-tops. On the downside, they are not as convenient to open and close as zippers.
Access
The most common access point seen in backpacks is through the top of the bag. While this has the benefit of being the easiest to load, since you can stand the backpack upright or lay it down on its front or back, it also means that if you want to reach anything at the bottom, you’ll need to get through everything on top.
Alternatively, many trekking backpacks also have access points at the bottom allowing you to retrieve items at the bottom or middle of a fully packed bag without having to take everything out (e.g. Wanaka Adventure Pack and Alpaka Shift Pack). This is particularly useful for camping/trekking since there are very specific ways to pack your items based on weight.
Certain special-use backpacks also have side access zippers, such as the Boundary Prima. These allow you to swing the backpack on one shoulder to your front and access items in the main compartment. It’s a convenience feature and useful for quick access.
A last common access style seen is the back panel access, such as on the NYA-EVO Fjord36 or the Bobby Anti-theft backpack. Back panel access is usually meant for special uses or designs such as camera bags in the case of the Fjord36 or anti-theft features in the case of the Bobby.
Drawstring tops (or cinch cord)
are tightened via a string that can be clamped to hold the opening closed. These are common in large trekking backpacks because they can open very wide to allow you to fit large items like tents and sleeping bags inside. They’re often accompanied by a lid.
Lids
(also informally called “brains” if the lid has pocketing with its own volume) refer to what is literally a cap that sits on the top of the backpack. Many trekking backpacks have this as a floating lid that provide a cap over drawstring openings to keep water out and are buckled down. Smaller backpacks with lids often use zippers instead.
Top Pocket
This is where you keep things that you need to access quickly. Sunscreens, sunglasses, pocket guides, books, maps. This usually comes with a zip facing the back. Packing the top pocket is crucial. It gives shape to the backpack and helps it to balance.

Inner Top Pocket
This is on the inside of the top compartment. Keep your batteries, headlamps, camera parts, power banks, and documents here.
Backpack Handle
This needs to be sturdy and strong. Most airline handlers grab backpacks by this handle and throw your backpack around. If your backpack does not have this, then they will grab what comes next, which is usually the strings near the upper compartment. Your backpack could do with insurance if that’s the case.
Central zipper
Some newer bags have a more unique design with zippers that open down the middle of the backpack’s front face. This reduces the amount you need to unzip and opens up the bottom of the bag, allowing you to access contents near the bottom.
STRAPS
You can check out our guide on Shoulder Straps to get the details on shoulder straps, sternum straps, and load-lifter straps.
Load Adjuster Straps
These straps are often ignored at their peril. These little busters sometimes called stabilizer straps also relieve your shoulders from some of the weight of the backpack by bringing the bag forward to bring the center of mass inward.
Contoured Shoulder Straps
These are contoured in a boomerang shape. They hold firm and have padding. They never bend over your fingers. Pay close attention to this. Without the shape and the padding, don’t go near the backpack. These take the entire load of the backpack.
Shoulder Strap Adjuster
These keep the shoulder straps in place. They decide how the backpack sits. Too loose, the backpack slides towards your bottom. Too tight and the shoulder straps bite through your shoulders.
Tip: always readjust the shoulder strap adjusters after the first day’s trek. It takes a day for them to settle to the height and volume of the backpack.
Compression Strap
One of the least used straps by trekkers, yet very useful. Sternum straps help disperse the weight of the backpack off your shoulders a little bit, but not very much. It’s main purpose is to prevent the shoulder straps from sliding off your arms when moving around and to tug them inward a bit so your arms can move freely.
Additional stabilizer straps
Similar to the load-lifter straps, these straps pull the backpack closer to you (in this case they pull the bottom of the back closer to your butt) to improve balance by bringing the center of gravity closer to where it would naturally be if you weren’t wearing a backpack.
Sternum Strap
Again, a load sharing strap that is rarely used by trekkers. Sternum straps ease the pressure on your shoulders. Without the sternum straps, a backpack can feel like a ton. With one, it magically spreads out. Use them.
Aside from these, everyone is also very familiar with the waist / hip belt, which is also used to relieve your back from the weight of the pack. Ideally, the waist belt should be padded and sit directly on the top of your hip bones or just above it. Theoretically, the waist belt can also handle the entire weight of the backpack (e.g., if you have a waist belt securely fastened, you can take the shoulder straps off and the bag should still be held against your body by the waist belt). Small waist belts that have no padding and are just pieces of nylon webbing and keep the bag from swinging around (i.e. stabilization) and don’t offer much in terms of weight distribution.
Side Pockets
Terrific utility space to keep quickly needed stuff. Great for gloves, sunglasses, umbrellas, balaclavas, scarfs, medicine kits. Don’t overload or bulge the side pockets. It can affect the balance of the backpack.
Hip Belt
These help in reducing the load from your shoulders by almost 80%. It is the greatest suspension device in your backpack. Hip belts not only transfer the weight of the backpack to your hip, the burden of carrying the load moves to your legs as well. Hip belts are strictly not meant to hang down on your legs.
Hip Pouches
Modern backpacks have now added hip pouches to keep quickly accessible stuff. Useful to keep pen knives, matchboxes, pens, candies, chargers.
Stabiliser Strap
This connects the hip belts to the main body of the backpack. It helps to adjust the load of the backpack to the hips.
Ventilation System
Any backpack worth its salt will need to come with a mesh-like ventilation system. It prevents your back from sweating, with air circulating around.
Other Pockets
Kangaroo pockets are elastic pouches that are frequently seen on the front face of hiking backpacks.

They usually aren’t secured by zippers or other hardware but are a really easy and quick place to stow small items or relatively flat items like a shovel. They’re often stretchy so jackets can also be stowed there.
Lumbar Pad
This is the greatest asset for your spine. It keeps your spine straight, gives it cushion and prevents injury. The lumbar design makes a big difference. Avoid anything that is too spongy — those tend to push against your spine. Lumbar pads are another vital part of backpack design.
Traditionally this is where sleeping bags were kept. With organised trekking, use this space to keep your rain jackets, floaters, soiled clothes, liners.
Ice Axe Loops
Generally not used much by trekkers. Seasoned trekkers use them to hang ice axes or tools like carabiners. Definitely not meant to hang floaters or water bottles. Nothing must dangle from your backpack.
Accessories Pouch
For keeping water bottles or sundry accessories. Especially useful if you don’t like using hydration packs and need to dig into your water bottle. A backpack without an accessories pouch is almost useless. Also useful to keep litter, wrappers.
Rain Cover
Any decent backpack must come with its own rain cover. They are attached to the inside of the pouch so that they don’t get lost. Slides easily over the entire backpack.
Hydration Sleeves
This is usually inside the middle of the backpack at the back. This is where you hold your water bladders or pouches and are usually accompanied by some sort of port that allows you to thread the bladder’s tube out of the bag and a clip on the shoulder strap to hold it in place.
Tech sleeves / Laptop sleeves
are pretty self-explanatory and these days they are a staple for any EDC bag.

One thing to look out for in the laptop sleeves is whether or not the laptop will have any padding on the bottom of the bag or if it’s suspended from the bottom.
ADD-ONS
Here are a bunch of additional features commonly seen on backpacks! Some are pretty self-explanatory…
Pig snout (lash point)
Those square/diamond-shaped patches with two-slits in them? They have a purpose! These are lash points and allow you to tie items to the outside of your backpack or hook up a carabiner. Remind you of a certain animal’s nose?
Grab handles / haul straps
Typically, a backpack will have some sort of handle at the top between the shoulder straps. These grab handles range from a simple layer of nylon webbing to fully-padded grips. Larger bags with more features may also have multiple grab handles around the other sides of the bag.
Water bottle holder
you all know what this is. For some reason a lot of modern EDC bags don’t have water bottle holders anymore and it makes me sad. They’re really functional, even if you’re not climbing Angel’s Landing in the middle of the summer heat.
Compression straps
It helps reducing the size of your bag when it’s not fully packed and minimize your bag’s appearance. They’re also useful lash points to attach/hold gear and are most typically on the sides of the bag, but can also be found on the bottom.
Gear loops
outdoorsy packs often have loops on the front face that allow you to strap in items like trekking poles, axes, shovels, or picks. To use the loop for axes and picks, drop the handle all the way through the loop and rotate the handle upward to be secured by the elastic hook at the top of the bag.
Lumbar padding
Large trekking bags will often also have some sort of lumbar padding for your lower back. This point is where a lot of the weight of the pack might sit or rub against your body.
Air flow channels
Help ventilate your back and delay the onset of your sweaty mess. The ridges are typically shaped to try to balance comfort with airflow and also reduce the surface area of your back against the backpack. In hot weather, though, they won’t be able to prevent your back from getting sweaty. But at least they’ll delay it.
Daisy chains
They are a number of webbing loops sewn in a linear series that are basically a whole bunch of lash points lined up. Useful for attaching small items when you’re hiking.
MOLLE system / PALS
Like daisy chains, but on steroids. MOLLE is an acronym for modular lightweight load-carrying equipment and allows users to attached gear to an array of nylon webbing.

These rows of webbing are called PALS (pouch attachment ladder system). MOLLE systems are a standard for tactical gear and are used by the current generation of backpacks used by the US Army and many other armed forces.

Tie out loops
can be used in place of daisy chains and are essentially a few tiny loops stitched around the perimeter of the bag. These loops can be used as attachment points for elastic cords or twine to hold gear and add virtually no weight to the bag.
Pass-through / Eyelet / hydration port
All names for what is essentially a small hole in a backpack.

They’re intended to allow you to pass a cable, wire, or tube through the fabric of the backpack and can be seen with a variety of uses (e.g., tubes for water bladders or cables for headphones).
Rain fly
Since some backpacks are not as water resistant as others, they may come with a rain fly. These rain ponchos for backpacks just provide an extra layer of protection from the elements. Some backpacks come with them included or attached, but you can also buy them separately.
Luggage strap / pass-through
Travel backpacks usually have a wide strap on the back panel that allows you to attach it to the handle of a rolling luggage.

It’s a very convenient feature, but just be careful if you’re using a large backpack. It may outweigh a small rolling luggage and cause it to tip forward if you try to stand it up.
HARDWARE
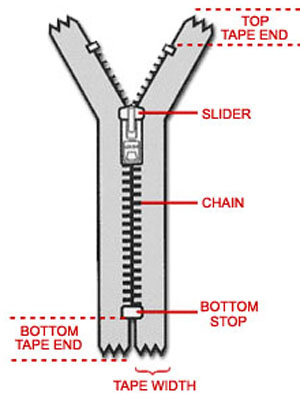
Zippers
Everyone knows what a zipper is and what it does. Here is a run down on all the components typically seen in backpacks:
- Teeth — the small ridges that interlock to form a sealed chain
- Chain — the continuous piece formed when the two halves of teeth are interlocked
- Sliders — the device that moves up and down the chain to open and close the zipper
- Pull tab — the “handle” that’s used to pull the zipper up and down, often with an extension tied to it for easier use
- Tape — the fabric on the sides of the teeth and chain
- Stops — the parts at the top and bottom that prevent the zipper from sliding off the chain
- Garage — a covering at the end of zipper where the slider can be parked to prevent water from leaking through the slider
- Aqua guard — a design that uses a polyurethane laminated tape that is more water resistant than traditional fabrics to improve the water-resistance of the zipper
Here… just look at these instead:
You may also see us refer to zippers by gauge size (usually #3 — #10). These indicate the size of the chain widths and teeth. The larger the number, the wider the chain/teeth are.

Airtight zippers also exist, but you don’t see them on backpacks. NASA developed them for high-altitude pressure suits and space suits.
Other Hardware
Hooks (G-hooks)
Around backpacks, you might also find various hooks, often in the shape of a “G”. These have a variety of uses, but can be used on compression straps, for attachments like nets (e.g., the helmet net on the NYA-EVO), or even closing mechanisms like the Lander. The problem with G-hooks is that how well the operate often depends on how tightly the hooks fit into the loops.
Magnets
I’ll assume everyone knows what magnets are. They create their own permanent magnetic field. These days, magnets are incorporated into buckles and lid flaps. Look for Fidlock components. They make amazingly smooth magnetic buckles that are just addictive to play with.
Frame
Many backpacks feature a frame to provide structural support and give the bags a consistent shape.

Most frames are internal and can be either a a stiff tube that follows the perimeter of the bag or a sheet frame that’s usually buried inside the back panel. External frames usually sit further away from your torso and while they increase the air ventilation against your back, but tend to be more top-heavy.
Adjusters
are what we call the hardware pieces used to adjust the length of the straps.

They usually also have a tab that you can pull outward to make it easier to loosen the straps.
Buckles
are the hardware pieces that fasten together (e.g., on hip belts and sternum straps). They’re usually made of plastic but you might occasionally see metals ones too, often something lightweight like aluminum.
Getting a good backpack is important to take off the load from your back and shoulders. An improper backpack can quickly ruin your experience of a trek. Get it right and you will enjoy your trek to the maximum.

Photography Backpack
Backpacks and cases